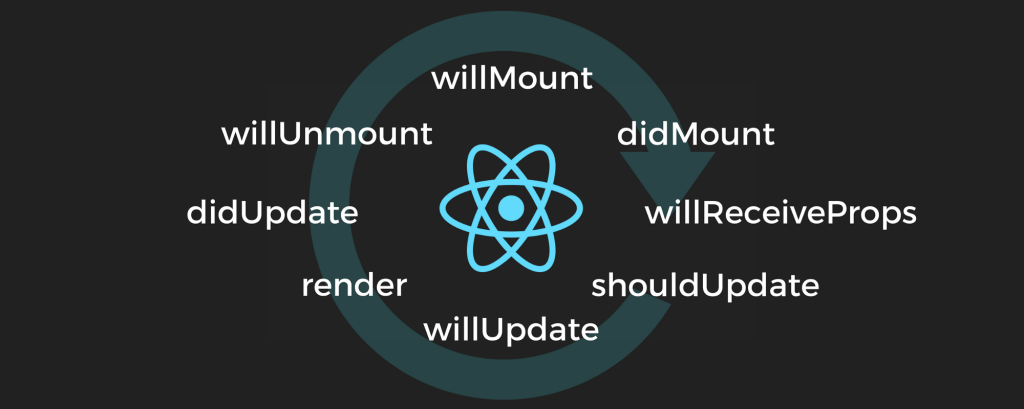
There are three phases a React component goes through, Birth (mounting), Growth (updates) and Death (unmounting). React’s lifecycle methods give you control over all of them. To explain each phase, I’ll be using the following application: a simple Spotify client that displays the user’s playlist and provides the ability to open it and play songs as shown below.

When we first load the application, the first thing that gets called is the render() method for the React DOM. This mounts the application onto the real DOM element. From here, all the components that are consumed by the application get rendered. Each component starts at its Birth phase. The first thing that is called is the constructor() for the component. This is where we initialise the state. In our application above, this simply initialises the application with empty playlist arrays and no currently playing songs. Next is the lifecycle method, componentWillMount(). This is called right before the render() method and can be used to make last-minute state changes. Then the first render() method is called. This is what puts the React node on the virtual DOM. Once the element is mounted on the real DOM, the lifecycle method, componentDidMount() is called. This is the last step in the birth phase. Since the element is now part of the DOM, we have access to it in our React code. This is a good place to make the service requests to get the actual playlist data and populate our components. Once the service returns the data, the Growth phase begins and the components are updated.
To understand the growth phase, we will go through a simple workflow in the Spotify client: playing a song from the playlist view as shown below.

When we press the play button on the playlist, many different components are affected. As we can see above, the immediate effect is the play button we pressed turns into a stop button. Another component that gets updated is the Player at the bottom, which shows a different track (the top track of the playlist). And finally, the track starts playing. What happens behind the scenes in React? Firstly, pressing that button triggers the callback function that was passed to it as a prop. This callback function is executed in the Playlist Tile which then changes the icon passed to the button component to a Stop icon. Since the props passed to the Button component are changed, the component needs to re-render and React’s lifecycle methods are called again. The first method called is componentWillReceieveProps(). As the name suggests, this is called when the props of a component change. And necessary state changes that are required based on the prop values can be done here. Next, shouldComponentUpdate() is called. A change in props or state does not necessarily mean we have to re-render. We can choose not to by returning false in this method. Once we have decided to update the component, componentWillUpdate() is called. This is similar to componentWillMount() and can be used for last minute changes. Then, render() is called again, this time with new state/prop values. This is the beauty of React. All we needed to do was update a prop, and React took care of re-rendering any necessary components with the updated values. Compare this with vanilla JavaScript/jQuery, where each user interaction would lead to a large amount manual updates on many elements (that we would need to keep track of). Once the render() call is finished and the component is updated on the DOM, componentDidUpdate() is called. This is a good place to actually play the track.
But, we are not done yet. So far, we’ve been changing things that are directly related to the button we just pressed. We still need to update the Player component. The callback function in the Playlist tile that updates the Play button to a Stop does one more thing. It calls a chain of callbacks all the way to the top-level App component. (Note: we need this chain because the Player is consumed by the top-level App component. This can be avoided by using a library like Redux, where state changes can be directly detected from any component). Through these callbacks, we simply need to pass the currently playing track to the App component. The App component then passed this track as a prop to the Player component, which also re-renders calling the same lifecycle methods as above. Once again, we see why React is so powerful. No other component was touched or re-rendered making sure the application’s performance is not affected. At the same time, for the developer, she simply had to update the props and the components update themselves.
Let’s now open a playlist. When the user opens the playlist, the Playlist Grid needs to be removed and the Track List needs to render.

Once again, we have callback functions lead to a state change in the Container component to let it know that it is time to switch to the Track List component. This will cause the Playlist Grid to unmount. The lifecycle method componentWillUnmount() is called. This lets the component know that it is about to be removed from the UI stack and any cleanup can be done here. Then our Container goes through its growth phase while the Track List component starts its birth phase, called all the lifecycle methods above.


Leave a comment